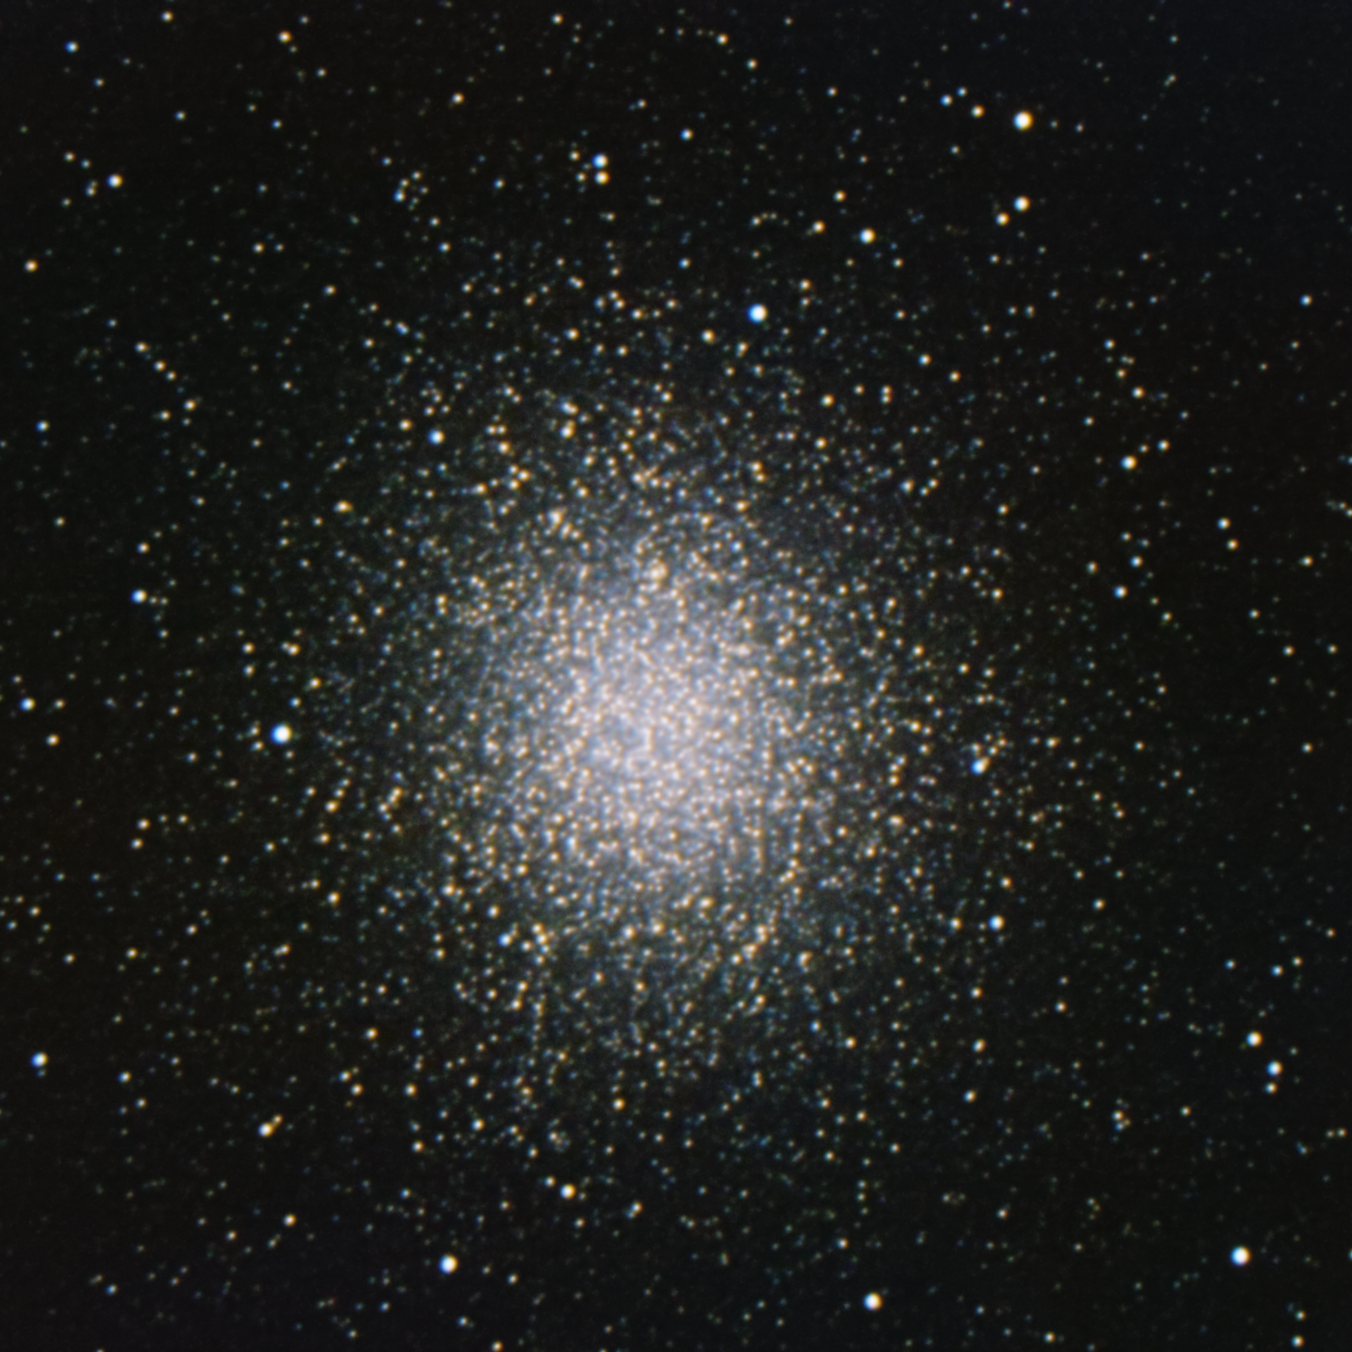
Removing the stars from your image can be done for artistic purposes or to separate the nebulosity from the star field so it can be processes differently. Removing the stars is highly dependent on a good star mask. There’s a couple tricks to getting an accurate star mask. The first is using MultiscaleMedianTransform to kill the larger structure sizes. If your image is in color already, I normally extract the lightness data from it (see Figure 1) to use as a support image for creating the star mask. I typically rename this image star_mask_support.
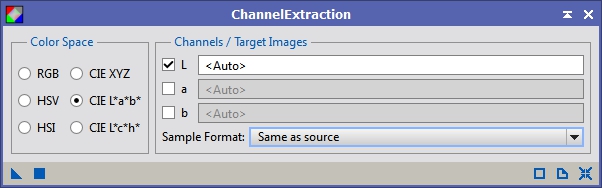
Figure 1: Extracting lightness data
Next, I bring up MultiscaleMedianTransform and make sure it’s reset to the default settings. Then I disable the residual layer (see Figure 2) and and set the Target to Lightness (CIE L*). You may have to change the layers (while keeping the residual layer disabled) depending on your star sizes. For the data I’m working with, 4 layers worked quite well. There will typically be a little nebulosity or galaxy structure left after running this. I use the clone stamp tool to remove the the non-stellar stuff before creating a star mask.

Figure 2: MultiscaleMedianTransform used to remove larger structures
The second trick is to make several star masks to catch the different star sizes (see Figure 3). This part takes a lot of fiddling. I don’t touch much in the Mask Preprocessing section except the Midtones. For the Mask Generation section I typically leave all options off and vary the Smoothness based on the star sizes I’m trying to re-create (if the start to look square, I up the value some). The other parameters just take experimentation.
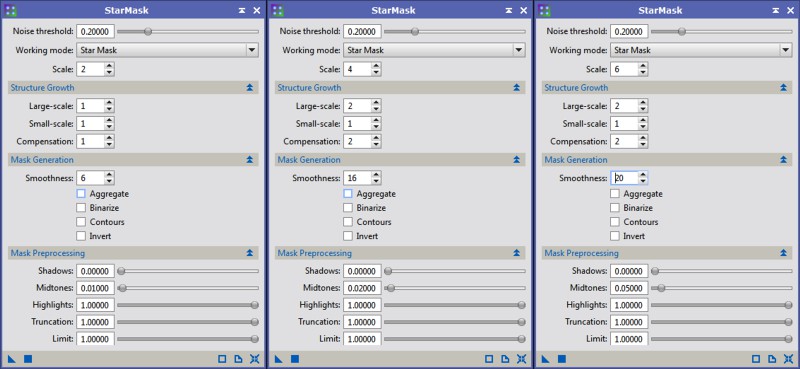
Figure 3: Three passes of StarMask to capture different star sizes
Now that you have several different star masks we need to combine them. I like to use PixelMath to do this. Some people use addition but I think that throws things off when you have the same star represented in multiple scale levels, so instead I use the max function (see Figure 4). This way the brightest elements of all three star masks will be combined into on mask. I typically apply this to the image called star_mask and then close the others.
Figure 4: Combining star masks with the max function in PixelMath
Now that we have an accurate star mask we can start removing stars. Apply your star mask to your image (leave it non-inverted) and then bring up the MorphologicalTransformation tool (see Figure 5). We are going to use the erosion mode which will shrink the stars, pinching in the surrounding data as the star reduces in size. Apply MT to your image and you’ll see the stars get smaller and fainter. Once the stars are almost non existent I switch back to MMT to smooth out the result a little (see Figure 6). Basically invert the layers you had disabled when creating the star_support image, so if you were using 4 layers before with the residual disabled switch that so the first four layers are disabled and the residual is enabled (if your image is in color remember to switch the target to RGB/K mode). Figure 7 shows a sequence of how the stars were reduced in this image where the first 6 tiles were using MT and the last 2 using MMT.
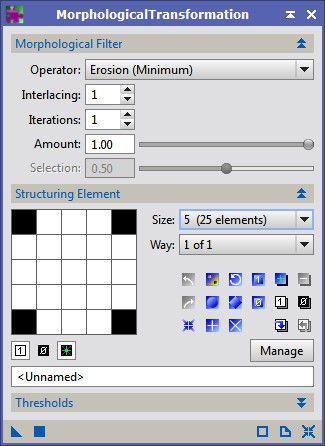
Figure 5: MorphologicalTransformation in Erosion mode

Figure 6: MultiscaleMedianTransform being used to remove stars

Figure 7: Sequence of star reduction
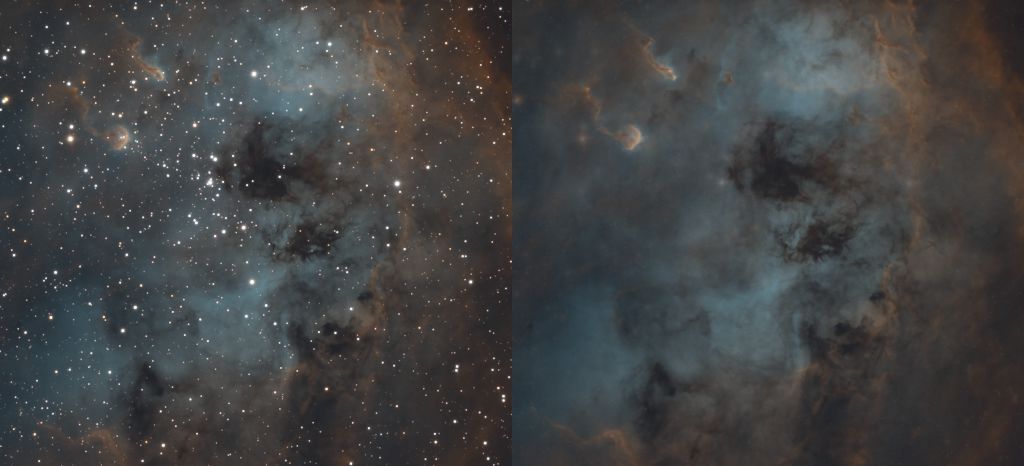
Figure 8: Side by side comparison after star removal
If you are really having trouble getting an accurate star mask, then there’s one other trick you can try. It requires that you plate solve your image and use that as a reference for the CatalogStarGenerator script. I only use this as a last resort because the catalogs frequently do not include all the star in the field. But if you simply can’t separate the stars from the nebulosity in your image this technique might help.
I hope this is useful!
Hi, great tutorial!
Quick question….after the erosion using MT. Do you leave the mask in place or remove it for the inverted MMT step?
Thanks again
Hi Carlos,
Yes, the star mask is still in place when doing the MMT step to remove stars.
Regards,
David
What if you wanna add the stars back in later? Is there a way to remove the stars and then replace them. Or more specifically. …remove narrowband stars and replace them with rgb stars?
Hi DJ,
You can definitely do this. If you want to add back in the existing stars, maybe with stretch different to what you’ve done to your starless image, you can take the image prior to star removal and subtract the image with star removal (you will need an offset to make sure there is no clipping of the shadows). This will create an image of just the stars. Then they can be added back together (taking care to remove the offset you added before) after you’ve done whatever you want to the starless and star only images.
If you have RGB star data you can add that in one of two ways (that I know of):
1) Make a mask of the star only image I described above and use that to limit adding just the stars from the RGB data in to the starless image
2) Make a starless version of your RGB data and then go through the same process to create a star only version of it. Then just like adding in the original stars you can stretch them separately before adding them together.
Regards,
David
Dave, very well written and easy to follow. Thank you! However, I think I’m missing a step. I’m working with a non-linear Ha image. MMT does indeed remove all nebulosity in my Heart image. Created my combined star mask. MT x 3 or x4 removes pretty much all stars. Followed by a couple of iterations of MMT as given. At the end, I pretty much have a black background image.
My dumb question, how do I restore the nebulosity without the stars? Thanks again for your hard work!
William
Thanks for the tutorial, is the mask created from a stretched image or from the lightness of a linear image?
Hi, thank you for your post. I am trying to do the same as you do, but what I get with the MMT is a swiss-cheese like image. Full of grey holes, very much different from your result. What the issue could be?
Thanks a lot!
Nicola
Hi, been reading through your tutorial to remove stars and I am a bit stack on the creation of the three Star Masks separately, so the question is how do I open each separate Sta Mask to combine them later with PixelMath.
Thanks
Charles
Hey Charles,
Each time you run the StarMask process it will create a new mask, usually called star_mask or star_mask1, etc. I typically run the star mask process with different settings to try to capture the different star brightness levels. I generally start with the largest star sizes using a larger scale, midtones, noise, and smoothness settings. Then as I try to capture smaller stars I slowly reduce each of those. I typically end up with 3 to 5 star masks. Once I am satisfied that I am capturing the vast majority of the stars I combine the stars in pixel math using a maximum function. Something like this: max(star_mask, star_mask1, star_mask2, star_mask3). I almost always have it setup to create a new image rather than overwrite one of the existing ones. Does that help?
Regards,
David
Hi Nicola,
You can generally do it with either. This changes how you adjust the midtones, highlights and other mask settings, but shouldn’t affect the overall result of the mask. That said, I tend to do this in the linear state.
Regards,
David
That’s hard to say Nicola. Are you referring to the MMT step later in the tutorial (Figure 6)? If so, what is likely happening is the star sizes in the mask are a bit too large relative to the actual stars. This means when you run MT and MMT it pulls in the darker pixels surrounding the star itself and that information is used to ‘blur’ in the star data. You could try reducing the structure growth settings when generating your star masks or using a Histogram Transformation or Curves to adjust their brightness on the existing masks. Keep in mind, this is a very finicky process. It took me many many attempts to get star masks that were appropriate and to tune the settings in the MT and MMT processes to get the result I did. These days, I frequently start star removal in PixInsight to get rid of most of them, then finish the job in Photoshop manually with the spot healing brush. Keep in mind that if I plan to do it this way I stretch the data first, or at least do an initial stretch so that you can see the data in Photoshop. I’ve also done this in PixInsight with CloneStamp, but that is cumbersome. At any rate, once I’ve completed the star removal I bring the image back into PixInsight and subtract it from the image with the stars so that I end up with an image of just the stars. This is useful if I plan on putting the stars back in later. By the way, removing the stars makes processing an image much simpler but if you plan on putting them back in then your star removal doesn’t have to be nearly as clean. It is only if you plan to completely remove the stars from a final image where you have to be very exhaustive about your processing.
Regards,
David
Hi William,
Sorry for the slow response. Things have been busy for me and I haven’t had a lot of time to spend on my website or other astronomy endeavors lately.
It may not have been clear in my tutorial, but the image you are doing the first pass of MMT on, to remove any nebulosity or larger structures, should be a clone of the original image or a lightness extracted version if your image is color. It is only used for helping to create the star masks for the later steps. Once you have the mask, the rest of the processing is applied to the original image. Hope this helps.
Regards,
David