This came from another question posted on Cloudy Nights. It’s something I’ve done with my prints and I’ve found this method easy and repeatable.
You can use the Crop tool to add borders of arbitrary sizes and colors to any image. This is the same as increasing the canvas size in tools like Photoshop and Gimp. The basic idea is to increase the size of the image, but instead of scaling the image to fit the new size we fill the extended area with a color. This can be black, white, purple or whatever you want. You can extend the canvas in multiple passes as well changing the complexity of the border.
For this example, we are going to add a fairly simple black and white border. Before we get started I’m going to talk a bit about the icons found on the bottom bar of most process windows (see Figure 1). These vary slightly based on what each process does and how it interacts with data.
If you click and drag the ‘New Instance’ icon it can be dropped on the desktop creating an icon with the current settings for that process. If you double click that deskop icon it will relaunch that process with those settings. This is every useful for saving off repetitive tasks. The ‘New Instance’ icon can also be dropped on an image window. This will apply that process, with whatever the current settings are, to that image. I do this all the time when cropping images with DynamicCrop. I’ll define the crop area using one image and then apply that same crop to multiple images by dragging the ‘New Instance’ icon to each of them. In special cases, the ‘New Instance’ icon can also be dropped on other processes. For example, you can use the ImageContainer to specify multiple images and then drag its ‘New Instance’ icon to the bottom bar of another process and that process will be repeated for all images specified in the ImageContainer.

Figure 1: Process Control Icons
The ‘Apply’ button does exactly what you think. It applies the process to the view selected. In some processes that view is selected in a drop-down box, while others rely on a specific image window being selected.
The ‘Apply Global’ button is a little more nebulous, but it essentially boils down to this: use this button if the process does not require any data from an image window to run. For example, the ImageIntegration process works on multiple images and can pull data from files rather than image windows (it can use image windows as a reference, but it isn’t required) so in most cases you would use the ‘Apply Global’ button.
I’m going to skip the ‘Edit Instance Source Code’ icon because that gets into Java Script territory but the ‘Browse Documentation’ button is very useful. Clicking this will bring up Process Explorer tab and extend the documentation browser section. Not all tools have documentation, but the ones that do are very thorough.
The last button in Figure 1 is the ‘Reset’ button. This simply returns all settings to their default state.
For our example we are going to draw a border with a thin and thick white line offset by some black spacing, so lets start by drawing a thin white border around everything. First, bring up the Crop process (It’s under the Geometry category) and make sure to reset it. Expand the ‘Margins/Anchors’ and ‘Fill Color’ sections. Because the first line is fairly thin lets set a margin size of 3 for all edges. This will expand the image 3 pixels in each direction, so if your original image was 1000×1000 the resulting image after this process would be 1006×1006. Before we apply this to our image though we need to change the fill color. The default fill color is black and we are starting with a white border directly outside the image area so we want to make it white. In the ‘Fill Color’ section change R, G & B values to 1.0 (leave the alpha value alone). Your Crop tool should look similar to Figure 2 at this point. Drag the ‘New Instance’ icon from the Crop tool to your image window and you should see a thin white line surrounding your image now (you may need to resize your image to see it).
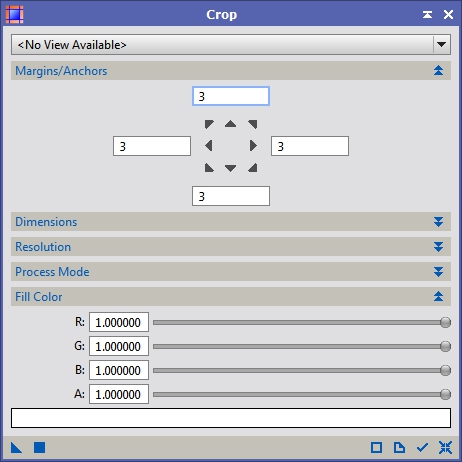
Figure 2: Using Crop to add a thin white border
Next we are going to add a black border to separate the first and second white borders. You can either reset the Crop tool or just change the settings at this point so that they look like Figure 3. Apply that to your image and you should see a black border show up outside of the white we added in the previous pass. Do the same for figures 4 & 5 which add another white and black border, both larger.

Figure 3: Using Crop to add a thin black border

Figure 4: Using Crop to add a thick white border

Figure 5: Using Crop to add a thicker black border
As you apply each different crop you should see a progression like Figure 6 (I separated the steps out to different images so you could see the changes easier). Keep in mind that depending on your sensor resolution this border may not look the same. If you are using a 25 megapixel sensor this border will look tiny and if you have a 1 MP camera it will look enormous, so you’ll have to vary the sizes and colors to suit your preferences and equipment.
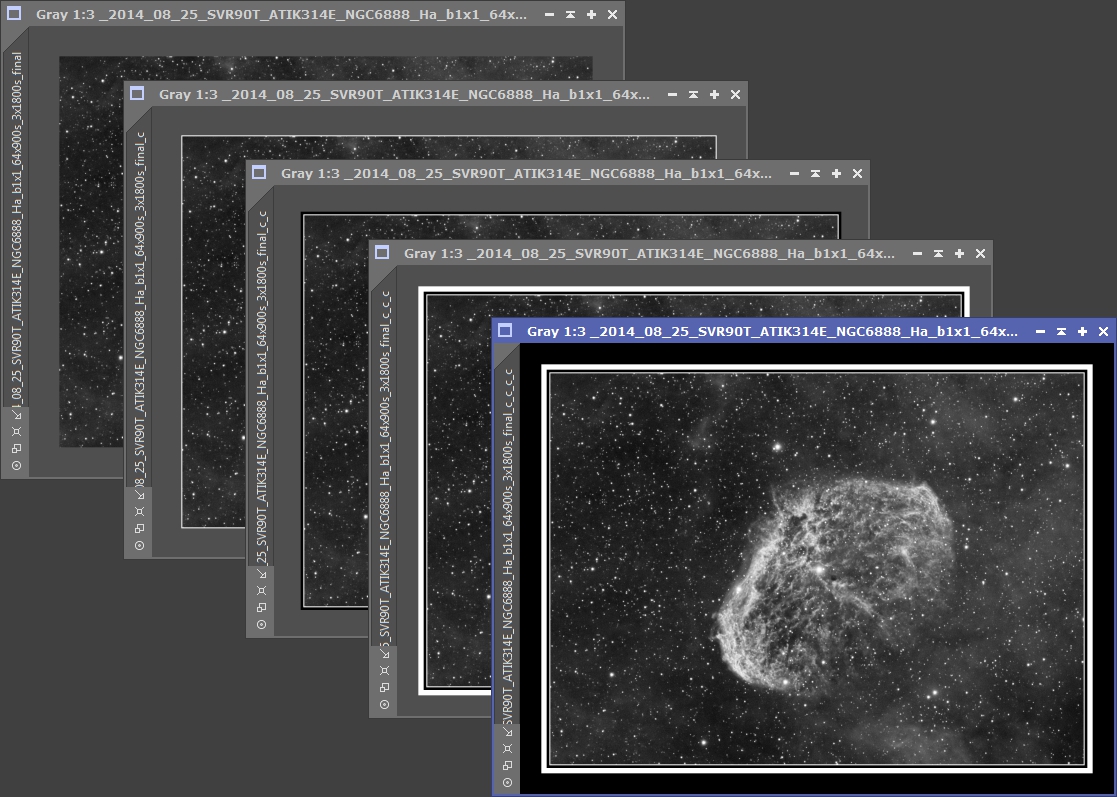
Figure 6: Progress of Crop adding different white and black borders
If your images are generally about the same size, you can make this process easily repeatable by using the ProcessContainer paired with desktop icons. Bring up the ProcessContainer tool and reset it. Bring up the Crop tool again and put the Figure 2 settings back in and drag the ‘New Instance’ icon from the Crop tool to the left hand side panel of the ProcessContainer. This will add a line title ‘Crop’ under the <Root> process. Do this same thing for Figures 3, 4, & 5 and you should have something that looks like Figure 7.
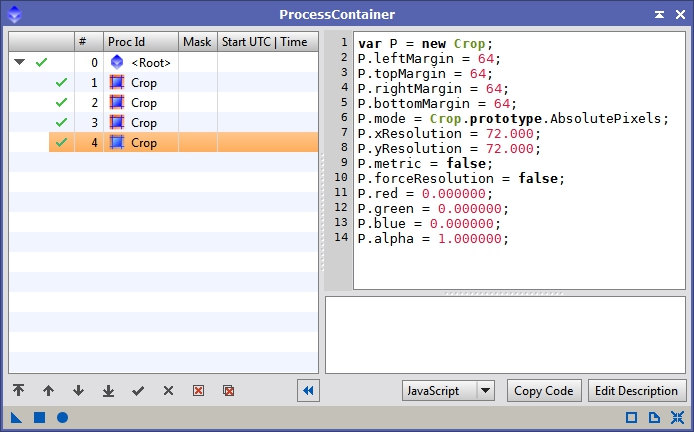
Figure 7: Multiple Crop processes in ProcessContainer
If you bring up your original image and drag the ‘New Instance’ icon from the ProcessContainer to the image, you will see the entire 4 band border show up with one step. You can also drop the ‘New Instance’ icon to the desktop. That icon can be renamed by right clicking it and going to ‘Set Icon Identifier…’. To use the desktop icon it can be dragged and dropped directly on an image or you can double click it to bring up the ProcessContainer with all the settings that icon was created with. The desktop icons can also be saved as a file or as part of a project so that they can be loaded up in subsequent sessions.
To save the desktop icons to a file, simply select the icons you want saved then right click on one of them and click ‘Save Selected Icons…’. Tell it where you want to save the file and click ok. If you’ve started a new PixInsight session and want to load those icons back in, right click on the desktop and select ‘Process Icons’->’Load Process Icons…’ or ‘Merge Process Icons…’. If you have some desktop icons already use the Merge version otherwise all your current desktop icons will be removed and replaced with only what is in that process file.
You can also save a project with desktop icons, which is what I typically do. I have a default project that I load when starting on a new image that has all sorts of desktop icons for everything from ImageCalibration to noise reduction. To save a project go to the ‘File’ menu and select ‘Save Project…’. This will bring up a form like Figure 8. If you are using this as a base project for multiple data sets then I would keep ‘Include images’ turned off. When you start a new PixInsight session, simply go to ‘File’ ‘Load Project…’ select your project file and click OK.
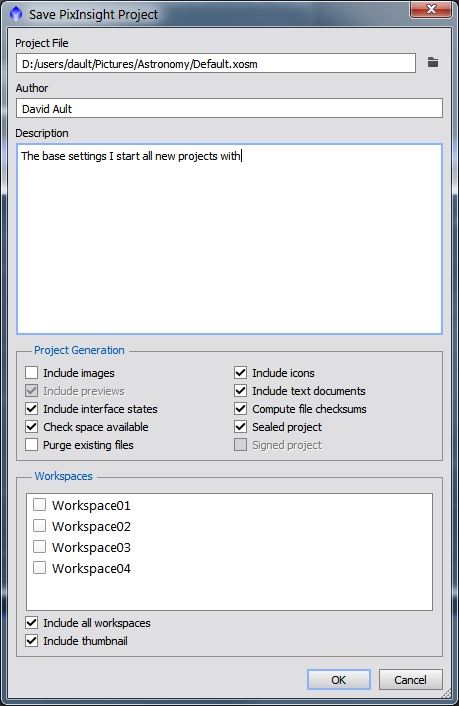
Figure 8: Saving a project file
I hope this helps with all your border adding needs!